Building
Placing and moving parts
How a part goes down, turns, snaps to studs and joints, and moves once it is there.
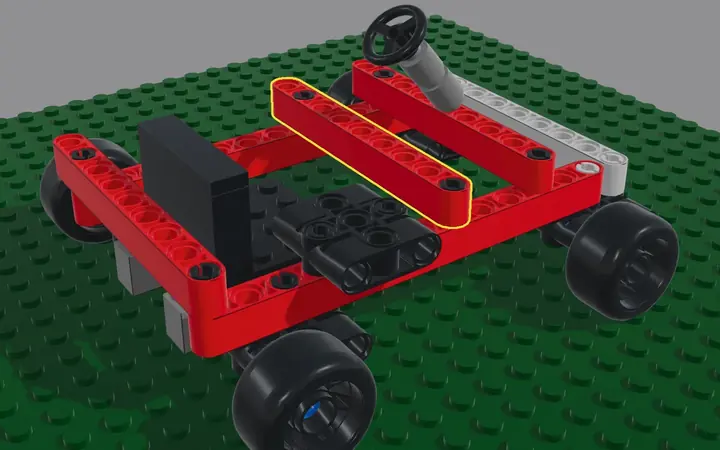
A part in hand
Brickworks rests in the Select tool. A part you choose from the parts bin, or take with Q, is in hand: it follows the pointer, snapping to whatever it would really fit, and a click puts it down. It stays in hand so you can put down several; Esc or a right-click lets go.
- Alt-click or G on a part takes one like it into hand.
- R turns the part in hand (or the selection) a step; Shift+R the other way. T tips it over.
- Snap and Turn on the toolbar set how far a nudge moves and how far R turns.
- A drag never places a part: on a part it carries the part, anywhere else it turns the view.
Type a number
With a part or a copy in hand, type a number to move it exactly: a small field opens at the pointer, the part stays where its ghost was, and the ghost shows where the number puts it, red where there is no room. Enter puts it down, one step to undo; Esc closes the field and the part follows the pointer again.
- 3x moves it 3 studs along x, -2z 2 studs back, 2py 2 plates up. b is a brick, l an LDraw unit, mm a millimetre: -14ly is 14 LDU down. A stud is the unit when none is given.
- A number alone goes the way the ghost last went: 3 after moving it right is 3 studs right.
- 23.58r turns it 23.58°, about the joint it is on or upright; 30t tilts it forwards. Straight after R or T, before the pointer moves, a number alone is that turn instead of their step: R then 30 turns it 30°.
- Several at once: 2x-1py. Sums work too: 40/2+1lx.
- On the model, straight after R or T turned a selection, a number takes their place the same way, shown in hand until Enter.
Parts sit on a lattice of studs and plates, as real bricks do: a part goes down only where nothing else already is, and a model opened from a file with parts a fraction off their studs can have them squared up with Tools › Seat parts on their studs.
Under, beside and sideways
Aim at the underside of an overhang and the part goes beneath it. Tip a plate with T and aim at a side stud (a headlight brick, a bracket) and it goes on sideways, studs out. Parts with studs on their sides are read at their real width.
Onto a joint
A Technic pin, axle, beam, clip or bar in hand snaps into a hole, onto a pin, an axle or a bar it would really go into. R turns it about the joint, T the other way on. An axle goes through a hole flush with its far face; point past that face and it goes on through to where you point. A gear pointed onto an axle beside another gear is seated in mesh where the teeth allow, and the status line says what it meshes with, or why not: too far apart, a bush in the way, square spurs.
Connect by a point
A long Technic beam has many holes, and the one you want is rarely the one the pointer finds first. With the part in hand press N, or choose Connect on the toolbar: its pins, holes, axles, bars and clips light up in blue where it stands. Click the one it goes on by, then the pin, hole or bar it goes on: only that point snaps, so a 1 x 16 goes on its pins by its end hole at once. A pin or an axle goes in from the side you point from, and a wheel goes on an axle where you point along it. T puts it on the other way, R turns it about the joint, N again picks another point, and Esc goes back to placing as usual.
With nothing in hand, Connect works on a part already in the model: click the part, then its point, then where it goes. The move is one step to undo, and Esc puts it back where it was. Studs still go on by the stud grid, as every part does.
Copy, paste and duplicate
Select, then Ctrl+C and Ctrl+V, or Ctrl+D to duplicate. The copy is in hand: a click puts it down, R turns it, Esc puts it away. After Ctrl+D, or a click with the Clone tool, another copy stays in hand for the next, so five window bays are five clicks; Esc or a right-click stops. Ctrl-drag on a part copies it straight off. Ctrl+X cuts.
Patterns
A fence, a colonnade, a round tower or a wheel's spokes are copies laid out at once:
- Straight after a copy: put a Ctrl+D copy down one step along, then type
11xand Enter to make it one of 11 in the row, each the same step again./4cuts the gap between the copy and where it came from in four, putting three between. One Ctrl+Z takes the copy and all the rest back. - Edit › Pattern… (Ctrl+Shift+D) copies the selection In a row along x, z or up, Round what it stands on, the joint it hangs on or the middle of the floor, or Along a hose laid in the model. In all counts the selection: 16 is a ring of sixteen.
The copies are drawn where they will go as you type, each checked for room. One with no room is red, says what is in its way, and nothing goes down until they all fit.
Move and turn what is down
Select parts, then X lifts them: they follow the pointer, a click puts them down and Esc puts them back where they were. R turns a selection where it stands. Where it has no room to turn, the parts in the way light up for a second (red, or amber on a red part) and it comes into hand already turned: aim and click to put it where it fits, or Esc to leave it as it was. T and the Rotate tool do the same. The arrow keys (or W A S D) nudge it a stud, and Page Up and Page Down raise or lower it.
The Move, Rotate and Hinge tools on the toolbar do the same with the mouse alone. Exact positions are typed in Properties, or as a number while it is in hand.
Rings and arrows
With the Rotate tool, a click on a part puts three rings on it; with Move, three arrows. Drag a ring to turn the selection about that axis, or an arrow to slide it along one. A click on the part again does the tool's own step: Rotate turns it by the turn step, Move picks it up.
- Between the arrows are three small panes. Drag one to slide the selection on two axes at once, snapped on each.
- Round the rings is a fourth, pale ring: it turns the selection about the view's own axis, as if turning a picture of it. Inside the rings, drag anywhere off them to roll it freely, like a trackball.
- The tag beside them says whose axes they are: Part axes (the part's own, however the part under it is turned), Model axes or View axes. Click the tag for the next.
- They stand where the part hangs from: the pin, hinge or clip it turns on, or the stud R turns it about. Alt-click another point to turn about it; Alt-click empty space to go back.
- A ring snaps to quarter turns near its middle, to the Turn step on the ring, to 5° just outside it and to 1° further out. Faint circles mark where while you drag. An arrow snaps to the Snap step, and to the finest step when the pointer is well off its line.
- Type a number while you drag, or straight after, to make it exact: degrees for a ring (23.58), a length for an arrow (3 studs, 2p plates), and for a pane both its axes (2x -1z). Enter puts it there; Esc leaves the drag as it was. A free roll has no number.
- Nothing goes through anything: a drag stops at the last place with room, and the part in the way lights up.
- Esc or a right-click while dragging puts it back. Each drag is one step to undo.
Mirror, replace and paint
- Edit › Mirror (Shift+M) mirrors the selection, swapping each part for its left- or right-handed twin where there is one.
- Edit › Replace with the part in hand swaps every selected part for the one you hold, keeping where each was.
- C paints the selection in the current colour; the Paint tool paints each part you click.
- An assistant mirrors parts by number with
mirror_parts, in place as Shift+M does, or as a copy beside them: across the model's middle, a left half makes the right half.
Split and merge
- Alt+S splits the selection: a plate, brick or tile into 1 x 1s on the same studs, a 1 x 1 brick into three 1 x 1 plates, and a slope or curved slope into 1-wide slopes of the same angle and length.
- Alt+M merges the selected plates, bricks and tiles of each colour into the fewest real parts made in that colour, in one press: five 1 x 2 plates in a 2 x 5 become a 2 x 4 and a 1 x 2, and three stacked plates become a brick.
- Both are on the menu you get by right-clicking a part. Whatever was attached stays attached, and one undo takes the change back. When no real part is made of the selection, the status bar says so and nothing changes.
- An assistant does the same to parts it names, with
split_partsandmerge_parts.
Lock and hide
L locks the selection so nothing moves it by accident; Shift+L unlocks everything. Ctrl+H hides the selection, Shift+H shows only it, and Alt+H shows everything again.
Sub-assemblies
Select some parts and press Ctrl+G to make them a sub-assembly and name it. A click then takes it whole, a double-click edits inside it, and Esc leaves. Copies made with Ctrl+D follow the original: change one and they all change, until Build › Make this copy unique. Enter (or a double-click) edits inside the selected one, F2 renames it, and Ungroup (Ctrl+Shift+G) takes it apart one level.
Sections
Big models are built in sections, as big sets are. Build › Suggest sections proposes them from how the model is put together; the model tree's Accept, Merge, Split and Evaluate shape them. Y breaks the selected section out to work on it alone and puts it back; Shift+Y is the exploded view of every section.
Undo and history
Ctrl+Z undoes and Ctrl+Shift+Z redoes. History on the toolbar (or Edit › History) lists the steps you can go back to. Whatever the AI puts down is one undo step too.
Measure
Press U and click two points: the distance in studs, plates and millimetres. One LDraw unit is exactly 0.4 mm: a stud is 8 mm across, a brick 9.6 mm tall and a plate 3.2 mm.
Click near a pin, a hole, an axle, a bar or a hinge and the point goes on its middle. With both points on one, Measure also says the angle between them, to a tenth of a degree: where a spring or a link goes between two pin holes.
An assistant measures with measure, between two connectors it names, and is told the same words. A hinge you left at an angle reads back as that angle.